Our Blog
Latest news and updates from PiVPS
How to update/switch DNS of Windows Server OS
Your local internet service provider probably doesn’t have the fastest DNS servers, and that can slow down your browsing, since your browser needs to look up the IP address of every web site you try to view. Here is how to switch to either OpenDNS or Google DNS for faster browsing times.
This should work in Windows 7, 8, 10 or Windows server 2008, 2012 the same way.
Switching/Updating to a Better DNS Provider
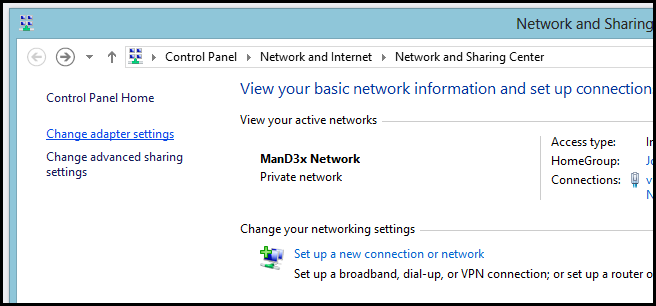
The first thing we need to do is right-click on the network status notification icon and choose to Open the Network and Sharing Center from the context menu.

Then click on the Change adapter settings hyperlink on the left-hand side of the Network and Sharing Center.

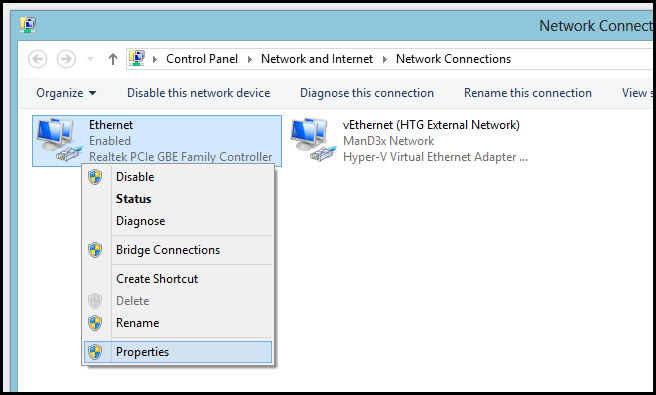
Now right-click on the network adapter you wish to change the DNS settings for and select properties from the context menu.

When the properties for your network adapter open, you will need to select Internet Protocol Version 4 (TCP / IPv4) from the list, then click properties.

Our example will have opened the IPv4 settings for your network adapter. You will see in the bottom half of the dialog that your PC is set to get its DNS settings “automatically”. You will need to change that so that we can manually specify the DNS servers we want to use. Now simply choose a service below and enter the DNS server addresses.
Google DNS
Preferred: 8.8.8.8
Alternate: 8.8.4.4
OpenDNS
Preferred: 208.67.222.222
Alternate: 208.67.220.220
We opted to go with Google DNS for now — while they could use this data to track your browsing habits, personally we’re not that worried about it.

That is all there it to it.
